
!["[New] Giving a Fresh Twist to Pre-Filtered Memories Using Instagram Tools for 2024"](https://www.lifewire.com/thmb/kcWA8zFzIaLieSuxnsocIBI-YIM=/540x405/filters:no_upscale():max_bytes(150000):strip_icc()/Childlearningonline_WillieBThomas_Getty-3e51600a64d742a0b5db4fadacead069.jpg)
"[New] Giving a Fresh Twist to Pre-Filtered Memories Using Instagram Tools for 2024"
Giving a Fresh Twist to Pre-Filtered Memories Using Instagram Tools
How to Add Instagram Filter to Existing Photos and Videos?

Shanoon Cox
Mar 27, 2024• Proven solutions
How to Add Instagram Filter to Existing Photos and Videos?
Instagram is one of the versatile platforms where people showcase their love for photos and content creation. On social media, users only want to put out photos that look attractive, especially people using Instagram as a blogging platform. Sometimes, pictures come out nice, but you would like to add a filter to enhance them further. Most people are clueless about how to add Instagram filter to existing photo. This article will guide you about all the tips and tricks you can use to alleviate your videos and pictures to make them look vibrant.


- Part 1: How to Add Instagram Filters to Existing Photos?
- Part 2: How to Add Instagram Filters to Existing Videos?
- Part 3: How to Add Filters on Instagram Photos When Uploading?
- Part 4: How to Add Filter to Instagram Reel Photo and Video?
Part 1: How to Add Instagram Filters to Existing Photos?
We all take random photos all the time through our cameras. But, you can be doubtful about posting them on Instagram because they look raw. Some people think they can only apply filters when taking photos directly from Instagram. However, this is not the case because you can apply an Instagram filter to existing images also. It not only makes the picture appear more attractive but also catches the audience’s attention. In this section, you will learn how to apply an Instagram filter to any photo from your gallery.
Step 1: Open Instagram and swipe left
To add Instagram filters, you have to open Instagram and log in to your existing ID. When you are on your news feed, you have to swipe left to open the stories option. When you swipe left, your camera will open automatically. Another way to open the stories option is to tap on the ‘+’ sign on your profile picture.
![]()
Step 2: Select an image from the gallery
After you open the stories option, the camera will open first. You can click a photo on the spot or select an existing image from the camera. Look at the bottom left side of the screen; you will see a square box. Click on the square box to select an image from your photo gallery.

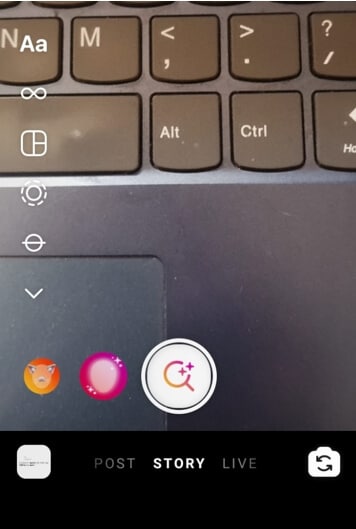
Step 3: press the smiley icon
After you have selected the image from the gallery, you can apply a filter to it before posting. On top of the screen, you will see a smiley or sparkle emoji. Click on the smiley emoji to access the existing or saved filter options to apply to the selected photo.
![]()
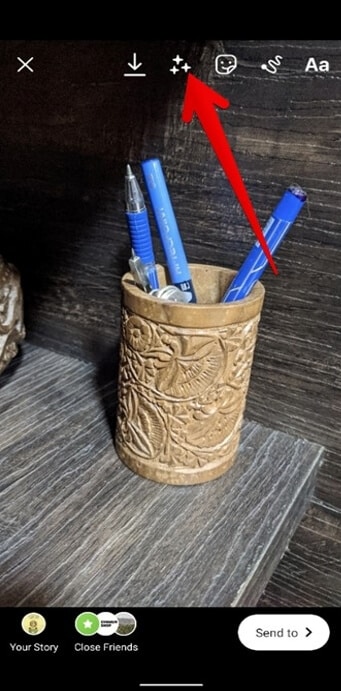
Step 4: Select filters
After clicking on the smiley icon, you will be seeing a lot of saved and existing filer options. Swipe left to try out and select a filter you like.

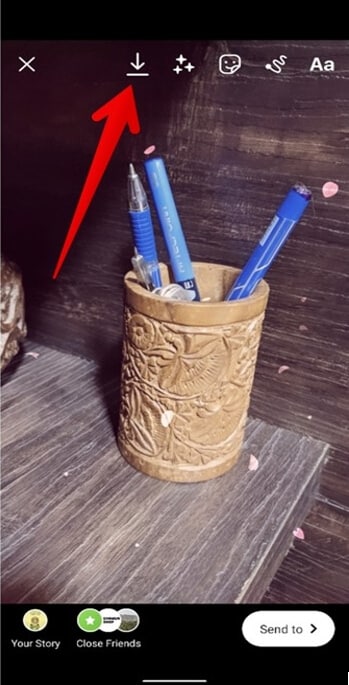
Step 4: Click done and post
After selecting the filter of your choice and applying it, click done on the top right corner and post the story.
![]()
A cross-platform for making videos anywhere for all creators

Why your video editing isn’t good enough? How about some creative inspo?
- 100 Million+ Users
- 150+ Countries and Regions
- 4 Million+ Social Media Followers
- 5 Million+ Stock Media for Use
* Secure Download

Part 2: How to Add Instagram Filters to Existing Videos?
Do you know how to add Instagram filter to existing photo/video? Instagram is now promoting reels through which people can express their creative side. You will see many trending reels on Instagram, and most of them are quite impressive. If you also want to trend on Instagram to gain your followers, your videos should look appealing. You can make your videos get more engagement by adding suitable filters to them. Here is how you can add filters to existing videos:
Step 1: Open camera
You can swipe left on Instagram to open the camera to capture videos for stories.
Step 2: Select a video from the gallery
On the bottom left of the screen, you will see a square box. Click on the square box; you will be taken to your gallery, where you can look for existing photos to upload.
Step 3: Click on the filter carousel
On the bottom, you will find a search icon which is also called the filter carousel. Through the filter carousel, you can find various kinds of filters and also type in the filter name if you have any in your mind. Apply the filter on the video.
Step 4: Download or upload
After you apply the filter, you can click on done on the top right to post. Also, there is an option to download the video if you like. You can save videos with filters in your gallery to use on other social media platforms.
Part 3: How to Add Filters o Instagram Photos When Uploading?
If you want to make your feed attractive, it should look aesthetic and synchronized. Using a more straightforward type of filter on all images can give your feed a cohesive look. We are going to let you know some simple steps to add filters to your photos when uploading.
Step 1: Click on the plus and select image
When you open the app, you will see a ‘+’ sign enclosed in the square on the middle-end of the screen. Click on it to upload images. You can also swipe up from the stories window to select an image from the gallery. Click next icon after selecting to proceed.
Step 2: Select a filter and adjust
After you click next, you will see a lot of filter options. You can swipe left to try out filters and select the one you like. You can double-tap on the chosen filter to adjust the intensity.

Step 3: Edit the image and post
When customizing the filter intensity, you can select next and click on edit to further enhance the image. You can increase brightness, sharpen the image, etc. When the image is edited as per your choice, you can tag people or simply post.
Part 4: How to Add Filter to Instagram Reel Photo and Video?
A plain Instagram reel without any filters or effects can feel boring to watch. Hence, a lot of content creators use filters strategically to make their reels more appealing. Here is how to add filters to your reel photos and videos.
Step 1: Upload photo or video on Reel
Open the story option and swipe to enable the Reel option. Once you have the reel option opened, go to the gallery and select an image or video of your choice.

Step 2: Click on shine emoji to add filters
On top, you will see a shine emoji option through which you can browse through filters and select the one you like; you can click to apply.
Step 3: post
After you are done adding effects, you can click on done to post, and you can also download the image.
FAQs About Instagram Filters
- Can you add Instagram story filters to existing photos?
Yes, it is easy to add an Instagram filter to existing photos from your gallery. The step-by-step explanation of how to add Instagram filter to existing photo is mentioned above.
- How to add Instagram story filters on camera roll?
Just swipe left to the stories window and swipe up to select an image from the camera roll. Then click on the smiling emoji on the tab and apply the filter of your choice. You can then share it on Insta or save it to your camera roll.
Conclusion
Often people do not know how to add Instagram filters to existing photos and videos. It is easy to learn, especially through the steps we have mentioned above. Filters are the ultimate hack to add cohesiveness and attraction to your feed or stories.
Shanoon Cox
Shanoon Cox is a writer and a lover of all things video.
Follow @Shanoon Cox
Shanoon Cox
Mar 27, 2024• Proven solutions
How to Add Instagram Filter to Existing Photos and Videos?
Instagram is one of the versatile platforms where people showcase their love for photos and content creation. On social media, users only want to put out photos that look attractive, especially people using Instagram as a blogging platform. Sometimes, pictures come out nice, but you would like to add a filter to enhance them further. Most people are clueless about how to add Instagram filter to existing photo. This article will guide you about all the tips and tricks you can use to alleviate your videos and pictures to make them look vibrant.
- Part 1: How to Add Instagram Filters to Existing Photos?
- Part 2: How to Add Instagram Filters to Existing Videos?
- Part 3: How to Add Filters on Instagram Photos When Uploading?
- Part 4: How to Add Filter to Instagram Reel Photo and Video?
Part 1: How to Add Instagram Filters to Existing Photos?
We all take random photos all the time through our cameras. But, you can be doubtful about posting them on Instagram because they look raw. Some people think they can only apply filters when taking photos directly from Instagram. However, this is not the case because you can apply an Instagram filter to existing images also. It not only makes the picture appear more attractive but also catches the audience’s attention. In this section, you will learn how to apply an Instagram filter to any photo from your gallery.
Step 1: Open Instagram and swipe left
To add Instagram filters, you have to open Instagram and log in to your existing ID. When you are on your news feed, you have to swipe left to open the stories option. When you swipe left, your camera will open automatically. Another way to open the stories option is to tap on the ‘+’ sign on your profile picture.
![]()
Step 2: Select an image from the gallery
After you open the stories option, the camera will open first. You can click a photo on the spot or select an existing image from the camera. Look at the bottom left side of the screen; you will see a square box. Click on the square box to select an image from your photo gallery.
Step 3: press the smiley icon
After you have selected the image from the gallery, you can apply a filter to it before posting. On top of the screen, you will see a smiley or sparkle emoji. Click on the smiley emoji to access the existing or saved filter options to apply to the selected photo.
![]()
Step 4: Select filters
After clicking on the smiley icon, you will be seeing a lot of saved and existing filer options. Swipe left to try out and select a filter you like.
Step 4: Click done and post
After selecting the filter of your choice and applying it, click done on the top right corner and post the story.
![]()
A cross-platform for making videos anywhere for all creators
Why your video editing isn’t good enough? How about some creative inspo?
- 100 Million+ Users
- 150+ Countries and Regions
- 4 Million+ Social Media Followers
- 5 Million+ Stock Media for Use
* Secure Download
Part 2: How to Add Instagram Filters to Existing Videos?
Do you know how to add Instagram filter to existing photo/video? Instagram is now promoting reels through which people can express their creative side. You will see many trending reels on Instagram, and most of them are quite impressive. If you also want to trend on Instagram to gain your followers, your videos should look appealing. You can make your videos get more engagement by adding suitable filters to them. Here is how you can add filters to existing videos:
Step 1: Open camera
You can swipe left on Instagram to open the camera to capture videos for stories.
Step 2: Select a video from the gallery
On the bottom left of the screen, you will see a square box. Click on the square box; you will be taken to your gallery, where you can look for existing photos to upload.
Step 3: Click on the filter carousel
On the bottom, you will find a search icon which is also called the filter carousel. Through the filter carousel, you can find various kinds of filters and also type in the filter name if you have any in your mind. Apply the filter on the video.
Step 4: Download or upload
After you apply the filter, you can click on done on the top right to post. Also, there is an option to download the video if you like. You can save videos with filters in your gallery to use on other social media platforms.
Part 3: How to Add Filters o Instagram Photos When Uploading?
If you want to make your feed attractive, it should look aesthetic and synchronized. Using a more straightforward type of filter on all images can give your feed a cohesive look. We are going to let you know some simple steps to add filters to your photos when uploading.
Step 1: Click on the plus and select image
When you open the app, you will see a ‘+’ sign enclosed in the square on the middle-end of the screen. Click on it to upload images. You can also swipe up from the stories window to select an image from the gallery. Click next icon after selecting to proceed.
Step 2: Select a filter and adjust
After you click next, you will see a lot of filter options. You can swipe left to try out filters and select the one you like. You can double-tap on the chosen filter to adjust the intensity.
Step 3: Edit the image and post
When customizing the filter intensity, you can select next and click on edit to further enhance the image. You can increase brightness, sharpen the image, etc. When the image is edited as per your choice, you can tag people or simply post.
Part 4: How to Add Filter to Instagram Reel Photo and Video?
A plain Instagram reel without any filters or effects can feel boring to watch. Hence, a lot of content creators use filters strategically to make their reels more appealing. Here is how to add filters to your reel photos and videos.
Step 1: Upload photo or video on Reel
Open the story option and swipe to enable the Reel option. Once you have the reel option opened, go to the gallery and select an image or video of your choice.
Step 2: Click on shine emoji to add filters
On top, you will see a shine emoji option through which you can browse through filters and select the one you like; you can click to apply.
Step 3: post
After you are done adding effects, you can click on done to post, and you can also download the image.
FAQs About Instagram Filters
- Can you add Instagram story filters to existing photos?
Yes, it is easy to add an Instagram filter to existing photos from your gallery. The step-by-step explanation of how to add Instagram filter to existing photo is mentioned above.
- How to add Instagram story filters on camera roll?
Just swipe left to the stories window and swipe up to select an image from the camera roll. Then click on the smiling emoji on the tab and apply the filter of your choice. You can then share it on Insta or save it to your camera roll.
Conclusion
Often people do not know how to add Instagram filters to existing photos and videos. It is easy to learn, especially through the steps we have mentioned above. Filters are the ultimate hack to add cohesiveness and attraction to your feed or stories.
Shanoon Cox
Shanoon Cox is a writer and a lover of all things video.
Follow @Shanoon Cox
Also read:
- [New] In 2024, Twists That Tell Stories Mastering the Art and Technique of Spinning Visuals for Maximum Impact on Social Media Platforms
- [New] Top 4 Strategies for Success in Instagram Loop Creation for 2024
- [Updated] Top 6 Must-Have Apps to Elevate Your Instagram Video Content for 2024
- [New] From Fresh Face to Hashtag Hero Unleash the Secrets for Swift Social Media Success on Instagram
- [Updated] In 2024, Steps to Instagram Verification & Fan Growth in Under 150 Characters
- [New] The Lowdown on Instagram's Video Time Frame for 2024
- [Updated] VisionVoice Tips for Perfectly Sized Insta Posts for 2024
- 2024 Approved Share Your Vids YouTube to Insta-Stories
- [Updated] In 2024, Revamp Your IGTV Titles Quickly & Efficiently
- [Updated] Social Media Self-Proofing Deciphering IG Identity for 2024
- [New] Step Forward Leveraging Live Talks in the Instagram World
- 2024 Approved Techniques to Upload Extended Videographics on Instagram
- [New] Backtracking Visual Vectors Techniques for Tracking Originals in Instagram Posts
- [Updated] Leverage Loops for Stirring Instagram Engagement & Likes for 2024
- [Updated] The Best Edges for Instagram Excellence – An Essential Guide
- [New] 2024 Approved Turbocharging Your Instagram Footage
- The Secrets to Compelling Instagram Video Descriptions
- In 2024, Influence Unleashed Insta’s Most Stellar Personalities Ranked
- [Updated] Unveiling Today's #Instagram Trends and Tags
- 2024 Approved Pro Tips to Enhance Your Use of Instagram's Query Symbol
- [Updated] Top 10 IGTV Edit Apps Maximize Your Video Content
- [New] In 2024, Follow the Leaders on IGTV for Inspiration
- [Updated] Going Against the Grain Instagram Video Reversal for 2024
- [New] Spurring Instagram Audience for More Vids
- Latest Instagram Photo and Video Size Checklist
- [New] 2024 Approved InstaMosaic Syncing Videos Across OSes
- [New] Elevate User Participation via Personalized IG Story Polls for 2024
- The Art of Humor in Video Tips for Facebook and Instagram Memes for 2024
- [New] In 2024, Blending Past Memories with Instagram's Vivid Filters
- [New] Mastering Video Cuts for Instagram Feed
- In 2024, Unveiling Instagram's Secrets for Powerful Video Chats
- Spotting Instagram's Newly Deactivated Accounts
- [New] In 2024, Optimize Your Videos for Instagram Mac Resizing Guide
- [New] In 2024, Navigating Instagram's Latest Filters A Year-Round Guide
- [New] Crafting a Viral Phenomenon on IGTV with Savvy Hash Tags for 2024
- [New] Privacy-First The Leading Storywatchers
- [Updated] Insights on Instagram Maximum Video Length
- 2024 Approved The Audio Avenger Your Pathway to Sound in Story Posts
- [Updated] Top 15 Safe, Free iOS/Android Insta-Follower Apps
- 2024 Approved Mastering the Art of YouTube Posts via Instagram Stories
- [New] 8 Exemplary Templates Dominate Social Media Creatives for 2024
- In 2024, Discreet Viewer's Guide Best Hidden Apps for Stories
- In 2024, Ways To Find Unlocking Codes For Motorola Moto G04 Phones
- New Whats Next After Virtualdub? A Review of the Top Video Editing Alternatives
- 2024 Approved Free vs Paid Discover the Best Zoom Transcription Tools
- 2024 Approved Say Goodbye to Shaky Cam Video Stabilization Tips for Premiere Pro Users
- In 2024, Cost-Effective Desktop Capture The Ultimate Top 10 List
- Here are Some Pro Tips for Pokemon Go PvP Battles On Poco C55 | Dr.fone
- [New] In 2024, Leading Tech Premium Choices of Mac Videograbbers
- Updated 2024 Approved Unleash Your Creativity Running Windows and Mac Video Editing Apps on Chrome OS
- New In 2024, How to Add Miniature Effect in Video with Filmora
- 6 Solutions to Fix Error 505 in Google Play Store on Realme V30 | Dr.fone
- [Updated] 2024 Approved Pinnacle Recording Solutions Best 15 Free Options for PC/OSX
- Boundless Video Recorder App
- [New] Mastering the Art of Using EZ Grabber with This Tutorial
- [Updated] In 2024, Pinnacle Picks Best Online HD Video Recorder Tools
- [New] Best Mac Image Sorter
- Updated In 2024, Magix Movie Editor Secrets Perfecting Audio Fusion in Your Clips
- [Updated] 2024 Approved Vision Capture Expert Insights Into Video Tech
- Updated In 2024, A Beginners Guide to Effective GarageBand Recording Processes
- [New] Optimal Video Saver Best Chromebook Recorder for 2024
- How to Unlock Apple iPhone 13 Pro, Apples New iPhone | Dr.fone
- 2024 Approved Enhancing M4A Listening Pleasure Advanced Tips for Android Users
- Overview of the Best Nokia C12 Plus Screen Mirroring App | Dr.fone
- [Updated] Building a Robust 360 Video Broadcast Framework for FB for 2024
- New Essential Websites to Foster New Relationships Online Safely
- 2024 Approved What Is a Transparent Logo and Why Do You Need It
- New The Art of Stop Motion on Instagram A Comprehensive Guide for Creators for 2024
- Updated 2024 Approved Of the Incredible Tools Hidden Under Final Cut Pro X, We Bring Final Cut Pro L-Cuts and J-Cuts in Todays Article. Learn What Is a J-Cut in Final Cut Pro Along with an L-Cut and How to Do Them in FCPX
- Mastering Your Music on a Chromebook The Top 8 DAWs that Will Elevate Your Sound (Updated List, 2023)
- [Updated] 2024 Approved Reverse-Image Retrieval in Social Media (FB) Explained
- Fix App Not Available in Your Country Play Store Problem on Vivo T2 5G | Dr.fone
- New 2024 Approved The Ultimate Guide to Gaming Intro Software for PC and Mac
- In 2024, How to Come up With the Best Pokemon Team On OnePlus Nord N30 5G? | Dr.fone
- [Updated] Evolution of Gaming Logging Beyond FBX Limits for 2024
- [Updated] In 2024, Unlock Facebook Ad Success with These 3 Adapted Writing Techniques
- 9 Quick Fixes to Unfortunately TouchWiz has stopped Of Oppo A38 | Dr.fone
- 2024 Approved Top 7 Digital Tools for Seamless Audio Cutting and Editing
- Ways To Find Unlocking Codes For Vivo V27e Phones
- [New] 2024 Approved Game On The Best Xbox Extra Storage Choices
- In 2024, Easy Ways to Manage Your Oppo A78 5G Location Settings | Dr.fone
- How To Restore Missing Contacts Files from Nokia 105 Classic.
- In 2024, Best Solutions for Realme Network Unlock
- [Updated] In 2024, Advanced Techniques for Enhancing Your FB Video Campaigns
- Title: "[New] Giving a Fresh Twist to Pre-Filtered Memories Using Instagram Tools for 2024"
- Author: Ian
- Created at : 2024-05-21 17:30:24
- Updated at : 2024-05-22 17:30:24
- Link: https://instagram-clips.techidaily.com/new-giving-a-fresh-twist-to-pre-filtered-memories-using-instagram-tools-for-2024/
- License: This work is licensed under CC BY-NC-SA 4.0.
