![[Updated] In 2024, Unwinding Film Narratives The Art of Reversing on Instagram](https://thmb.techidaily.com/519b3f4f99f21bc6077dc8413643f3b96c2bf221ab645eab192a9d9f6936accf.jpg)
"[Updated] In 2024, Unwinding Film Narratives The Art of Reversing on Instagram"
Unwinding Film Narratives: The Art of Reversing on Instagram
Of the several new trends generating headlines, the Reverse Video is the one that has received the most amount attention. Before this, Instagram provided a function that allowed you to shoot a video and then reverse it to demonstrate the impact.
However, since Instagram has eliminated the ability to reverse video from Stories, Reels, and Posts, many users have inquired how to reverse video on Instagram. While there is no straightforward solution to this topic, we have a technique to integrate the Reverse Video Instagram for our readers. Without further ado, let’s get started!
In this article
01 How to Record Video in Reverse on Instagram?
02 How to Reverse Video on Instagram Reels and Story on Mobile?
03 How to Reverse Instagram Videos and Audio on Desktop?
04 How to Reverse Instagram Videos and Audios Online?

Part 1: How to Record Video in Reverse on Instagram?
When you play a video backwards, you will generate some unique effects with your video. Examples include making people walk backward, getting them to leap forward instead of forward, and dancing in reverse.
While many would also say that you can challenge the principles of science, whether it’s releasing a microphone and seeing it fly up into your palm or filming a fountain in action and showing a replay of the water rising right up to the top of your display.
You can even make pets run backward and rainfall up instead of down. Many of the significant consumer video editing applications (such as Snapchat) have begun to follow the trend, and they are all doing it effortlessly!
Here’s how you can record video in reverse on Instagram:
Step 1: If you want to create a video that plays in reverse mode, start by opening the Instagram Stories camera.
Step 2: Swipe through the available choices at the bottom of the display, such as Hands-Free, Boomerang, Live, etc., until you reach the Rewind recording mode, which looks like this as shown in the picture below.
Step 3: Click the Record button at the bottom of the display to create videos.
And there you have it – you’ve just recorded a video in reverse mode on Instagram!
Part 2: How to Reverse Video on Instagram Reels and Story on Mobile?
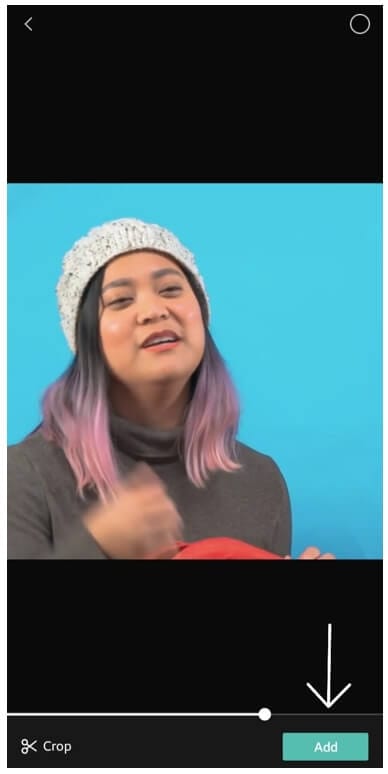
To reverse a recorded video and upload to Instagram later, you can also try some mobile video editing software on Android and iPhone. CapCut is one of the best reverse video program that we suggest the most for you to use out of all the ones available on the market.
In addition to being completely free and without a watermark, the instructions on how to reverse in CapCut are also straightforward to follow. With a single click, you can instantly create a reverse video on your Android or iOS device without the need to first configure any settings.
Here are the steps that you should be familiar with and practice if necessary:
Step 1: Open the CapCut application on your smartphone and click on the Create a New Project option, to begin with.
Step 2: Now, select the video of your choice from the phone Gallery and press the Add button to import it to the CapCut app.
 Easy and Safe Partition Software & Hard Disk Manager
Note: If you want to download your previous Story or Reels videos, you can try some video downloaders for Instagram to get your videos.
Step 3: After the file has been imported, tap on the Effects option as shown at the bottom of your display. From the array of options available in the Effects menu, swipe to your right-hand side until you reach the Reverse option, as shown in the picture below. Now, click on it.
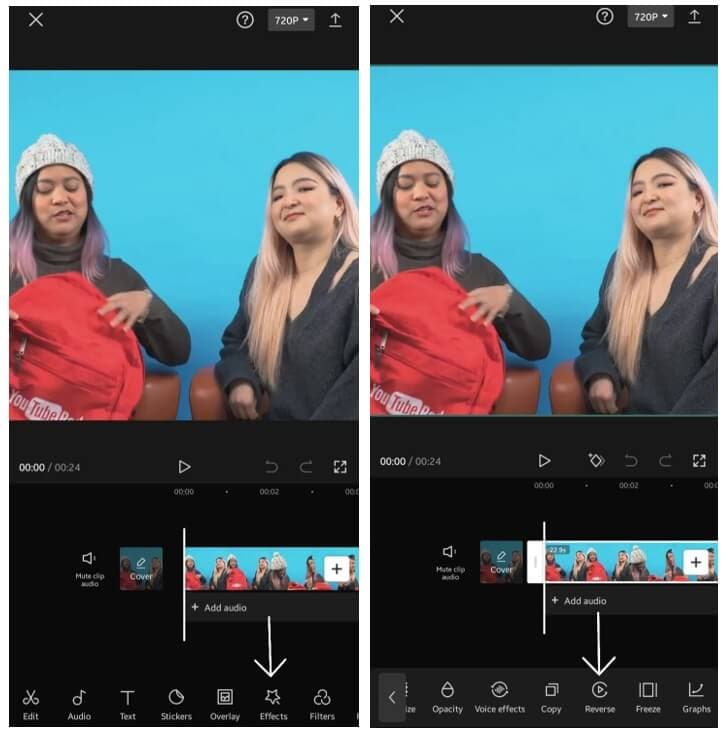
Step 4: The moment you click on the Reverse option, the video will automatically start reversing. It may take a while to reverse the video if the size of the video is too large. In our case, this Wondershare Filmora video was only 24 seconds which didn’t take longer than 40 seconds to reverse.
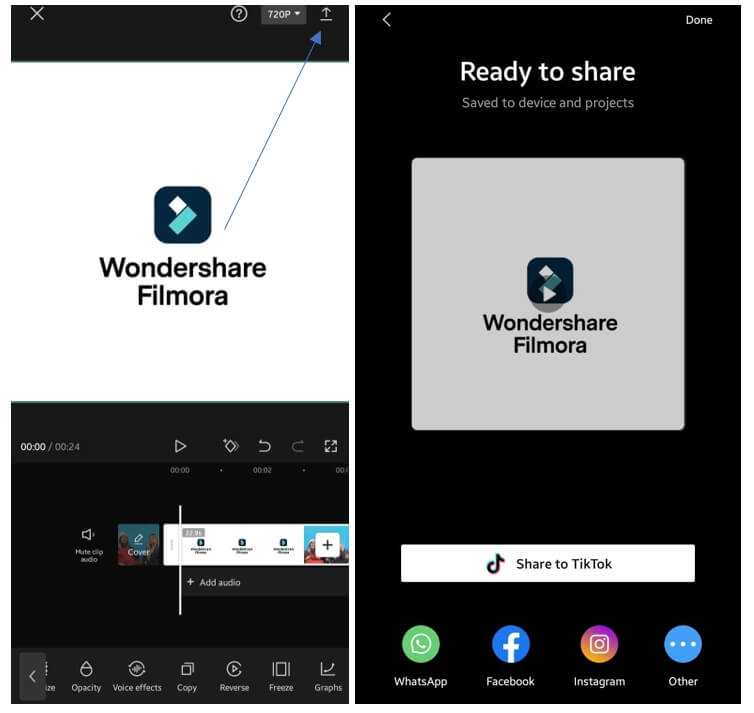
Step 5: Once the video is reversed, you can begin Exporting the file by clicking the Arrow-like option in the upper right-hand corner of the screen. And now, you can Share/Upload the reversed video to Instagram.
Part 3: How to Reverse Instagram Videos and Audio on Desktop?
In several instances, the reversing video effect has been utilized to great advantage by the filmmakers.
Wondershare Filmora is an excellent tool for creating your desired effect. It is compatible with practically all video formats, including AVI, DVD, compatible-MPEG, MP4, MOV, and MKV.
For Win 7 or later (64-bit)
For macOS 10.12 or later
If you have some footages on desktop, you can then try some desktop video editors to make a reverse video for Ins. Here, we recommend Wondershare Filmora video editor, which is one of the best Instagram video editors on Windows and Mac computers, and it offers you a complete set of editing tools that range from the most basic to the most advanced available on the market to edit your videos in an easy and advanced way.
Check out the article to find out how to edit Instagram videos with Filmora video editor in detail. And the following illustrations of how you can use Filmora video editor to produce a reverse video effect:
Step 1: Open the Filmora video editor and choose New Project from the main menu. Then**,** import your video files into the timeline. You may need to change the project aspect ratio to 1:1 or 9:16 based on your needs.

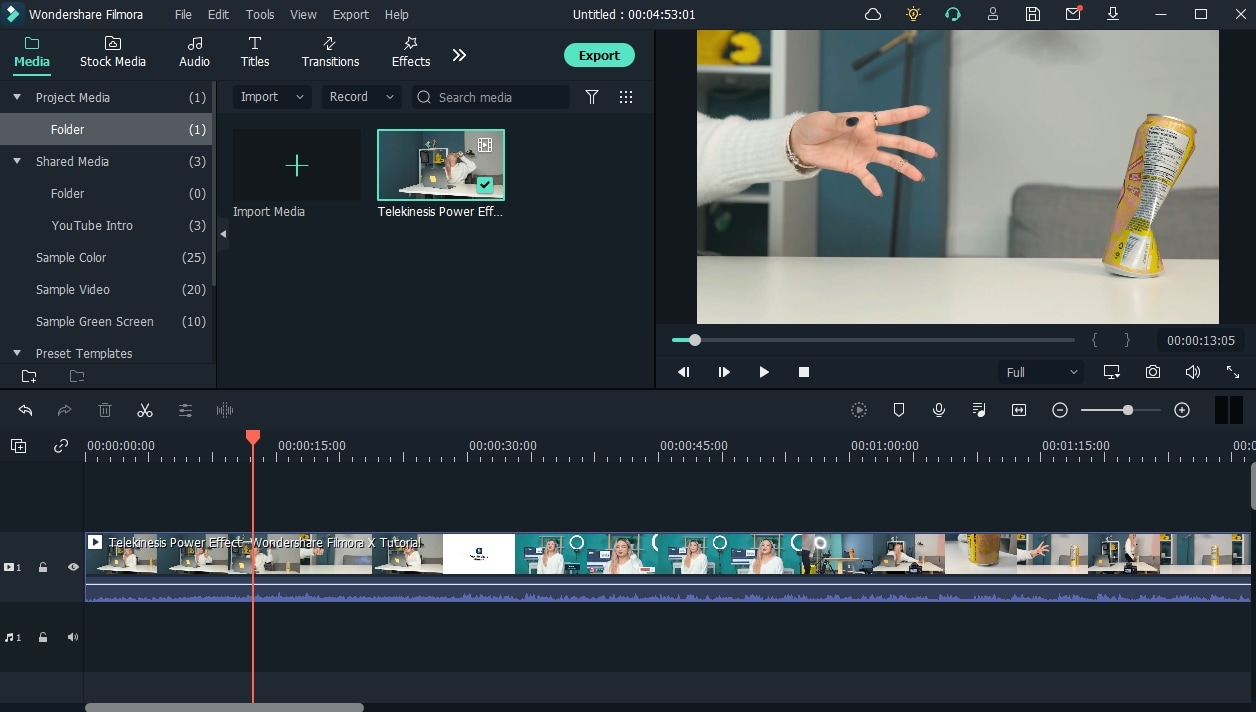
Step 2: Here I just want to add the reverse effect at a specific segmentation, so I split the video clip. If you don’t know how to split the video, you can check: How to use Filmora video splitter to split video into small parts .
Right-click on the split clip in the timeline, hover over the Speed option from the context menu, and then click the Reverse option. The video and audio will be reversed automatically with normal speed in the timeline, and you can play it in the Preview window to check.
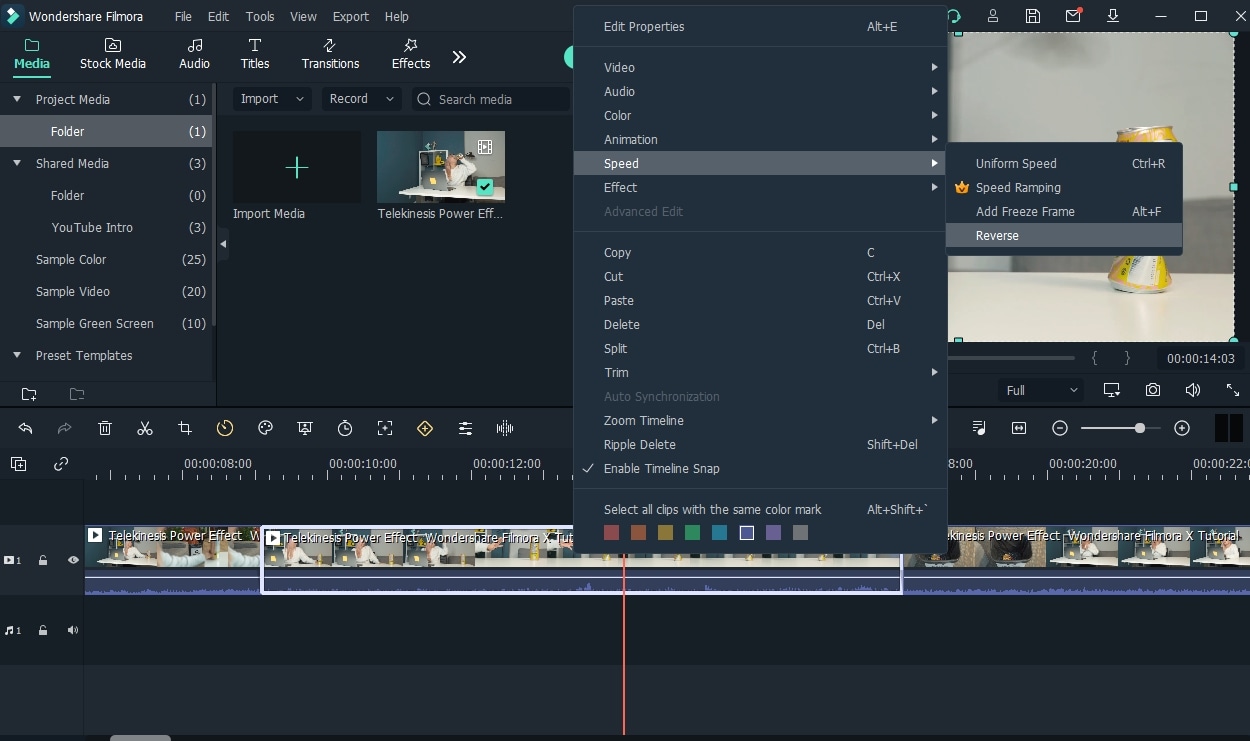
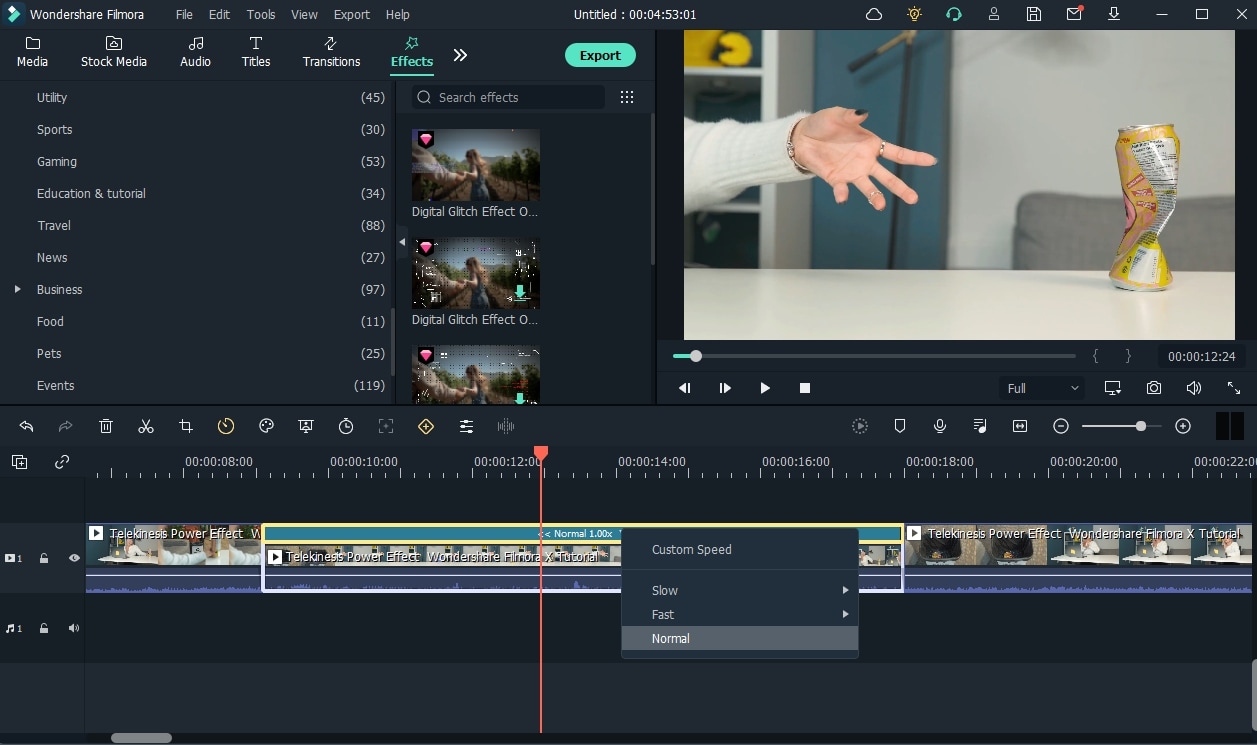
Click the drop-down menu on the Normal Speed in the timeline to slow down or speed up the playback.
In case you don’t want the distorted sound after reversing, you can mute the audio or detach the audio from video easily. To reverse
For Win 7 or later (64-bit)
For macOS 10.12 or later
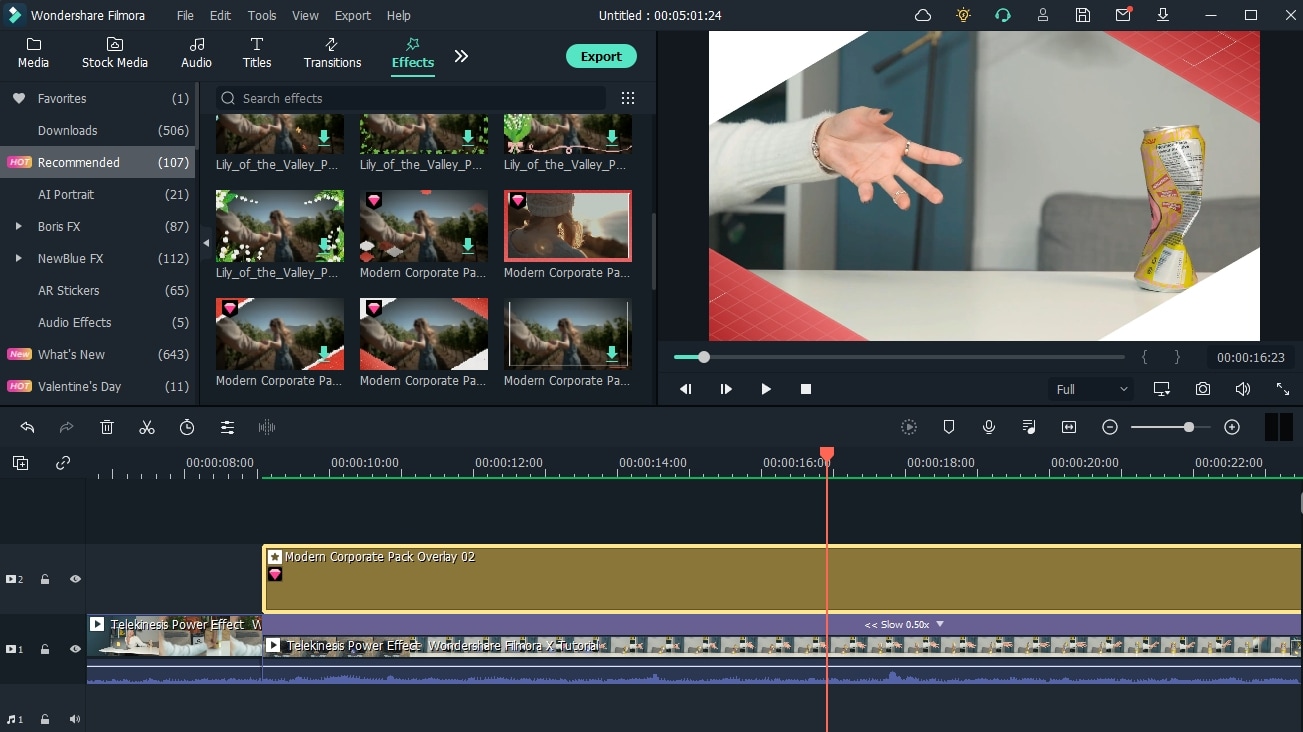
Note: Filmora video editor allows you to apply filters and accents to your movie if you want to make it more appealing. You may choose a filter from the Effects menu at the top.
Step 3: After polishing the video with additional effects, filters or elements, you can then click the Export button to save the video. You may either choose a video format to save it on local or upload it straight to YouTube.

Conclusion
According to Instagram, the purpose to reverse Instagram video and sharing it to your Instagram profile is to provide diversity to your posts while also impressing your viewers or followers. While the activity of reversing a video is straightforward, you may get a unique look by filming the movie using your creativity first before reversing it.
We have provided some solutions to reversing videos and audio for Instagram video in the above content, hope it is helpful. You can record a video in rewind mode to reverse the video on Ins, try some mobile editing apps or desktop video editors, or use online video reversers。
Out of all of the ways listed above, you will find utilizing Filmora the most straightforward and intuitive. What’s more, by using Filmora’s rich editing tools, you may produce even better films than you would have otherwise.
02 How to Reverse Video on Instagram Reels and Story on Mobile?
03 How to Reverse Instagram Videos and Audio on Desktop?
04 How to Reverse Instagram Videos and Audios Online?
Part 1: How to Record Video in Reverse on Instagram?
When you play a video backwards, you will generate some unique effects with your video. Examples include making people walk backward, getting them to leap forward instead of forward, and dancing in reverse.
While many would also say that you can challenge the principles of science, whether it’s releasing a microphone and seeing it fly up into your palm or filming a fountain in action and showing a replay of the water rising right up to the top of your display.
You can even make pets run backward and rainfall up instead of down. Many of the significant consumer video editing applications (such as Snapchat) have begun to follow the trend, and they are all doing it effortlessly!
Here’s how you can record video in reverse on Instagram:
Step 1: If you want to create a video that plays in reverse mode, start by opening the Instagram Stories camera.
Step 2: Swipe through the available choices at the bottom of the display, such as Hands-Free, Boomerang, Live, etc., until you reach the Rewind recording mode, which looks like this as shown in the picture below.
Step 3: Click the Record button at the bottom of the display to create videos.
And there you have it – you’ve just recorded a video in reverse mode on Instagram!
Part 2: How to Reverse Video on Instagram Reels and Story on Mobile?
To reverse a recorded video and upload to Instagram later, you can also try some mobile video editing software on Android and iPhone. CapCut is one of the best reverse video program that we suggest the most for you to use out of all the ones available on the market.
In addition to being completely free and without a watermark, the instructions on how to reverse in CapCut are also straightforward to follow. With a single click, you can instantly create a reverse video on your Android or iOS device without the need to first configure any settings.
Here are the steps that you should be familiar with and practice if necessary:
Step 1: Open the CapCut application on your smartphone and click on the Create a New Project option, to begin with.
Step 2: Now, select the video of your choice from the phone Gallery and press the Add button to import it to the CapCut app.
Note: If you want to download your previous Story or Reels videos, you can try some video downloaders for Instagram to get your videos.
Step 3: After the file has been imported, tap on the Effects option as shown at the bottom of your display. From the array of options available in the Effects menu, swipe to your right-hand side until you reach the Reverse option, as shown in the picture below. Now, click on it.
Step 4: The moment you click on the Reverse option, the video will automatically start reversing. It may take a while to reverse the video if the size of the video is too large. In our case, this Wondershare Filmora video was only 24 seconds which didn’t take longer than 40 seconds to reverse.
Step 5: Once the video is reversed, you can begin Exporting the file by clicking the Arrow-like option in the upper right-hand corner of the screen. And now, you can Share/Upload the reversed video to Instagram.
Part 3: How to Reverse Instagram Videos and Audio on Desktop?
In several instances, the reversing video effect has been utilized to great advantage by the filmmakers.
Wondershare Filmora is an excellent tool for creating your desired effect. It is compatible with practically all video formats, including AVI, DVD, compatible-MPEG, MP4, MOV, and MKV.
For Win 7 or later (64-bit)
For macOS 10.12 or later
If you have some footages on desktop, you can then try some desktop video editors to make a reverse video for Ins. Here, we recommend Wondershare Filmora video editor, which is one of the best Instagram video editors on Windows and Mac computers, and it offers you a complete set of editing tools that range from the most basic to the most advanced available on the market to edit your videos in an easy and advanced way.
Check out the article to find out how to edit Instagram videos with Filmora video editor in detail. And the following illustrations of how you can use Filmora video editor to produce a reverse video effect:
Step 1: Open the Filmora video editor and choose New Project from the main menu. Then**,** import your video files into the timeline. You may need to change the project aspect ratio to 1:1 or 9:16 based on your needs.
Step 2: Here I just want to add the reverse effect at a specific segmentation, so I split the video clip. If you don’t know how to split the video, you can check: How to use Filmora video splitter to split video into small parts .
Right-click on the split clip in the timeline, hover over the Speed option from the context menu, and then click the Reverse option. The video and audio will be reversed automatically with normal speed in the timeline, and you can play it in the Preview window to check.
Click the drop-down menu on the Normal Speed in the timeline to slow down or speed up the playback.
In case you don’t want the distorted sound after reversing, you can mute the audio or detach the audio from video easily. To reverse
For Win 7 or later (64-bit)
For macOS 10.12 or later
Note: Filmora video editor allows you to apply filters and accents to your movie if you want to make it more appealing. You may choose a filter from the Effects menu at the top.
Step 3: After polishing the video with additional effects, filters or elements, you can then click the Export button to save the video. You may either choose a video format to save it on local or upload it straight to YouTube.
Conclusion
According to Instagram, the purpose to reverse Instagram video and sharing it to your Instagram profile is to provide diversity to your posts while also impressing your viewers or followers. While the activity of reversing a video is straightforward, you may get a unique look by filming the movie using your creativity first before reversing it.
We have provided some solutions to reversing videos and audio for Instagram video in the above content, hope it is helpful. You can record a video in rewind mode to reverse the video on Ins, try some mobile editing apps or desktop video editors, or use online video reversers。
Out of all of the ways listed above, you will find utilizing Filmora the most straightforward and intuitive. What’s more, by using Filmora’s rich editing tools, you may produce even better films than you would have otherwise.
02 How to Reverse Video on Instagram Reels and Story on Mobile?
03 How to Reverse Instagram Videos and Audio on Desktop?
04 How to Reverse Instagram Videos and Audios Online?
 NeoDownloader - Fast and fully automatic image/video/music downloader.
Part 1: How to Record Video in Reverse on Instagram?
When you play a video backwards, you will generate some unique effects with your video. Examples include making people walk backward, getting them to leap forward instead of forward, and dancing in reverse.
While many would also say that you can challenge the principles of science, whether it’s releasing a microphone and seeing it fly up into your palm or filming a fountain in action and showing a replay of the water rising right up to the top of your display.
You can even make pets run backward and rainfall up instead of down. Many of the significant consumer video editing applications (such as Snapchat) have begun to follow the trend, and they are all doing it effortlessly!
Here’s how you can record video in reverse on Instagram:
Step 1: If you want to create a video that plays in reverse mode, start by opening the Instagram Stories camera.
Step 2: Swipe through the available choices at the bottom of the display, such as Hands-Free, Boomerang, Live, etc., until you reach the Rewind recording mode, which looks like this as shown in the picture below.
Step 3: Click the Record button at the bottom of the display to create videos.
And there you have it – you’ve just recorded a video in reverse mode on Instagram!
Part 2: How to Reverse Video on Instagram Reels and Story on Mobile?
To reverse a recorded video and upload to Instagram later, you can also try some mobile video editing software on Android and iPhone. CapCut is one of the best reverse video program that we suggest the most for you to use out of all the ones available on the market.
In addition to being completely free and without a watermark, the instructions on how to reverse in CapCut are also straightforward to follow. With a single click, you can instantly create a reverse video on your Android or iOS device without the need to first configure any settings.
Here are the steps that you should be familiar with and practice if necessary:
Step 1: Open the CapCut application on your smartphone and click on the Create a New Project option, to begin with.
Step 2: Now, select the video of your choice from the phone Gallery and press the Add button to import it to the CapCut app.
Note: If you want to download your previous Story or Reels videos, you can try some video downloaders for Instagram to get your videos.
Step 3: After the file has been imported, tap on the Effects option as shown at the bottom of your display. From the array of options available in the Effects menu, swipe to your right-hand side until you reach the Reverse option, as shown in the picture below. Now, click on it.
Step 4: The moment you click on the Reverse option, the video will automatically start reversing. It may take a while to reverse the video if the size of the video is too large. In our case, this Wondershare Filmora video was only 24 seconds which didn’t take longer than 40 seconds to reverse.
Step 5: Once the video is reversed, you can begin Exporting the file by clicking the Arrow-like option in the upper right-hand corner of the screen. And now, you can Share/Upload the reversed video to Instagram.
 PaperScan Professional: PaperScan Scanner Software is a powerful TWAIN & WIA scanning application centered on one idea: making document acquisition an unparalleled easy task for anyone.
Part 3: How to Reverse Instagram Videos and Audio on Desktop?
In several instances, the reversing video effect has been utilized to great advantage by the filmmakers.
Wondershare Filmora is an excellent tool for creating your desired effect. It is compatible with practically all video formats, including AVI, DVD, compatible-MPEG, MP4, MOV, and MKV.
For Win 7 or later (64-bit)
For macOS 10.12 or later
If you have some footages on desktop, you can then try some desktop video editors to make a reverse video for Ins. Here, we recommend Wondershare Filmora video editor, which is one of the best Instagram video editors on Windows and Mac computers, and it offers you a complete set of editing tools that range from the most basic to the most advanced available on the market to edit your videos in an easy and advanced way.
Check out the article to find out how to edit Instagram videos with Filmora video editor in detail. And the following illustrations of how you can use Filmora video editor to produce a reverse video effect:
Step 1: Open the Filmora video editor and choose New Project from the main menu. Then**,** import your video files into the timeline. You may need to change the project aspect ratio to 1:1 or 9:16 based on your needs.
Step 2: Here I just want to add the reverse effect at a specific segmentation, so I split the video clip. If you don’t know how to split the video, you can check: How to use Filmora video splitter to split video into small parts .
Right-click on the split clip in the timeline, hover over the Speed option from the context menu, and then click the Reverse option. The video and audio will be reversed automatically with normal speed in the timeline, and you can play it in the Preview window to check.

Click the drop-down menu on the Normal Speed in the timeline to slow down or speed up the playback.
 PearlMountain Image Converter
In case you don’t want the distorted sound after reversing, you can mute the audio or detach the audio from video easily. To reverse
For Win 7 or later (64-bit)
For macOS 10.12 or later
Note: Filmora video editor allows you to apply filters and accents to your movie if you want to make it more appealing. You may choose a filter from the Effects menu at the top.

Step 3: After polishing the video with additional effects, filters or elements, you can then click the Export button to save the video. You may either choose a video format to save it on local or upload it straight to YouTube.
Conclusion
According to Instagram, the purpose to reverse Instagram video and sharing it to your Instagram profile is to provide diversity to your posts while also impressing your viewers or followers. While the activity of reversing a video is straightforward, you may get a unique look by filming the movie using your creativity first before reversing it.
We have provided some solutions to reversing videos and audio for Instagram video in the above content, hope it is helpful. You can record a video in rewind mode to reverse the video on Ins, try some mobile editing apps or desktop video editors, or use online video reversers。
Out of all of the ways listed above, you will find utilizing Filmora the most straightforward and intuitive. What’s more, by using Filmora’s rich editing tools, you may produce even better films than you would have otherwise.
02 How to Reverse Video on Instagram Reels and Story on Mobile?
03 How to Reverse Instagram Videos and Audio on Desktop?
04 How to Reverse Instagram Videos and Audios Online?
Part 1: How to Record Video in Reverse on Instagram?
When you play a video backwards, you will generate some unique effects with your video. Examples include making people walk backward, getting them to leap forward instead of forward, and dancing in reverse.
While many would also say that you can challenge the principles of science, whether it’s releasing a microphone and seeing it fly up into your palm or filming a fountain in action and showing a replay of the water rising right up to the top of your display.
You can even make pets run backward and rainfall up instead of down. Many of the significant consumer video editing applications (such as Snapchat) have begun to follow the trend, and they are all doing it effortlessly!
Here’s how you can record video in reverse on Instagram:
Step 1: If you want to create a video that plays in reverse mode, start by opening the Instagram Stories camera.
Step 2: Swipe through the available choices at the bottom of the display, such as Hands-Free, Boomerang, Live, etc., until you reach the Rewind recording mode, which looks like this as shown in the picture below.
Step 3: Click the Record button at the bottom of the display to create videos.
And there you have it – you’ve just recorded a video in reverse mode on Instagram!
Part 2: How to Reverse Video on Instagram Reels and Story on Mobile?
To reverse a recorded video and upload to Instagram later, you can also try some mobile video editing software on Android and iPhone. CapCut is one of the best reverse video program that we suggest the most for you to use out of all the ones available on the market.
In addition to being completely free and without a watermark, the instructions on how to reverse in CapCut are also straightforward to follow. With a single click, you can instantly create a reverse video on your Android or iOS device without the need to first configure any settings.
Here are the steps that you should be familiar with and practice if necessary:
Step 1: Open the CapCut application on your smartphone and click on the Create a New Project option, to begin with.
Step 2: Now, select the video of your choice from the phone Gallery and press the Add button to import it to the CapCut app.

Note: If you want to download your previous Story or Reels videos, you can try some video downloaders for Instagram to get your videos.
Step 3: After the file has been imported, tap on the Effects option as shown at the bottom of your display. From the array of options available in the Effects menu, swipe to your right-hand side until you reach the Reverse option, as shown in the picture below. Now, click on it.
Step 4: The moment you click on the Reverse option, the video will automatically start reversing. It may take a while to reverse the video if the size of the video is too large. In our case, this Wondershare Filmora video was only 24 seconds which didn’t take longer than 40 seconds to reverse.
Step 5: Once the video is reversed, you can begin Exporting the file by clicking the Arrow-like option in the upper right-hand corner of the screen. And now, you can Share/Upload the reversed video to Instagram.
Part 3: How to Reverse Instagram Videos and Audio on Desktop?
In several instances, the reversing video effect has been utilized to great advantage by the filmmakers.
Wondershare Filmora is an excellent tool for creating your desired effect. It is compatible with practically all video formats, including AVI, DVD, compatible-MPEG, MP4, MOV, and MKV.
For Win 7 or later (64-bit)
For macOS 10.12 or later
If you have some footages on desktop, you can then try some desktop video editors to make a reverse video for Ins. Here, we recommend Wondershare Filmora video editor, which is one of the best Instagram video editors on Windows and Mac computers, and it offers you a complete set of editing tools that range from the most basic to the most advanced available on the market to edit your videos in an easy and advanced way.
Check out the article to find out how to edit Instagram videos with Filmora video editor in detail. And the following illustrations of how you can use Filmora video editor to produce a reverse video effect:
Step 1: Open the Filmora video editor and choose New Project from the main menu. Then**,** import your video files into the timeline. You may need to change the project aspect ratio to 1:1 or 9:16 based on your needs.
Step 2: Here I just want to add the reverse effect at a specific segmentation, so I split the video clip. If you don’t know how to split the video, you can check: How to use Filmora video splitter to split video into small parts .
Right-click on the split clip in the timeline, hover over the Speed option from the context menu, and then click the Reverse option. The video and audio will be reversed automatically with normal speed in the timeline, and you can play it in the Preview window to check.
 With Screensaver Wonder you can easily make a screensaver from your own pictures and video files. Create screensavers for your own computer or create standalone, self-installing screensavers for easy sharing with your friends. Together with its sister product Screensaver Factory, Screensaver Wonder is one of the most popular screensaver software products in the world, helping thousands of users decorate their computer screens quickly and easily.
Click the drop-down menu on the Normal Speed in the timeline to slow down or speed up the playback.
In case you don’t want the distorted sound after reversing, you can mute the audio or detach the audio from video easily. To reverse
For Win 7 or later (64-bit)
For macOS 10.12 or later
Note: Filmora video editor allows you to apply filters and accents to your movie if you want to make it more appealing. You may choose a filter from the Effects menu at the top.
Step 3: After polishing the video with additional effects, filters or elements, you can then click the Export button to save the video. You may either choose a video format to save it on local or upload it straight to YouTube.
Conclusion
According to Instagram, the purpose to reverse Instagram video and sharing it to your Instagram profile is to provide diversity to your posts while also impressing your viewers or followers. While the activity of reversing a video is straightforward, you may get a unique look by filming the movie using your creativity first before reversing it.
We have provided some solutions to reversing videos and audio for Instagram video in the above content, hope it is helpful. You can record a video in rewind mode to reverse the video on Ins, try some mobile editing apps or desktop video editors, or use online video reversers。
Out of all of the ways listed above, you will find utilizing Filmora the most straightforward and intuitive. What’s more, by using Filmora’s rich editing tools, you may produce even better films than you would have otherwise.
- Title: [Updated] In 2024, Unwinding Film Narratives The Art of Reversing on Instagram
- Author: Ian
- Created at : 2024-07-24 23:49:16
- Updated at : 2024-07-25 23:49:16
- Link: https://instagram-clips.techidaily.com/updated-in-2024-unwinding-film-narratives-the-art-of-reversing-on-instagram/
- License: This work is licensed under CC BY-NC-SA 4.0.